- 데이터셋은 저장매체에 있는 데이터를 사용하기도 하지만, 직접 만들어 사용할 수도 있다.
- 직접 만들 때는 `tf.data.Dataset.from_tensor_slices()를 통해 객채를 만들어 여러가지 연산을 적용해 사용한다.
import tensorflow as tf
from tensorflow import keras

X=tf.range(10)
dataset=tf.data.Dataset.from_tensor_slices(X)
dataset- 이렇게 dataset이라는 객체를 생성하였다.
- 위 과정은 tf.data.Dataset.range(10)으로 만든 데이터셋과 동일하게 작동한다.
for item in dataset:
  print(item)

tf.Tensor(0, shape=(), dtype=int32)
# tf.Tensor(1, shape=(), dtype=int32)
# tf.Tensor(2, shape=(), dtype=int32)
# tf.Tensor(3, shape=(), dtype=int32)
# tf.Tensor(4, shape=(), dtype=int32)
# tf.Tensor(5, shape=(), dtype=int32)
# tf.Tensor(6, shape=(), dtype=int32)
# tf.Tensor(7, shape=(), dtype=int32)
# tf.Tensor(8, shape=(), dtype=int32)
# tf.Tensor(9, shape=(), dtype=int32)- 출력해보면 원래 1개의 벡터였던 함수가 각 원소별로 하나의 데이터를 이루는 데이터셋이 되었음을 확인할 수 있다.
13.1.1 연쇄변환
repeat()과 batch()
- 데이터셋을 반복하여 특정 개수로 이뤄진 배치 형태로 나눌 수 있다.
repeat()메소드를 통해 데이터셋을 반복할 횟수를 지정할 수 있다. 매개변수로 반복횟수를 지정해주지 않으면 계속해서 반복을 시행하게 된다.batch()메소드를 통해 데이터셋을 몇 개의 배치 단위로 나눌지 지정할 수 있다.
dataset = dataset.repeat(3).batch(7)
for item in dataset:
  print(item)

# tf.Tensor([0 1 2 3 4 5 6], shape=(7,), dtype=int32)
# tf.Tensor([7 8 9 0 1 2 3], shape=(7,), dtype=int32)
# tf.Tensor([4 5 6 7 8 9 0], shape=(7,), dtype=int32)
# tf.Tensor([1 2 3 4 5 6 7], shape=(7,), dtype=int32)
# tf.Tensor([8 9], shape=(2,), dtype=int32)- 만약 위 결과에서 개수가 맞지 않는 맨 마지막 배치를 생성하지 않기 위해서는
drop_remainder=True옵션을 지정하면 된다.
X=tf.range(10)
dataset=tf.data.Dataset.from_tensor_slices(X)
dataset = dataset.repeat(3).batch(7, drop_remainder=True)
for item in dataset:
  print(item)

# tf.Tensor([0 1 2 3 4 5 6], shape=(7,), dtype=int32)
# tf.Tensor([7 8 9 0 1 2 3], shape=(7,), dtype=int32)
# tf.Tensor([4 5 6 7 8 9 0], shape=(7,), dtype=int32)
# tf.Tensor([1 2 3 4 5 6 7], shape=(7,), dtype=int32)
map()과 apply()
- 데이터셋 객체에는 numpy와 같이
map()과apply()함수가 적용 가능하다. - map()메소드의 인자로 num_parallel_calls 옵션에 개수를 지정해주면 여러개의 스레드를 통해 작업을 처리하는 것이 가능해진다.
- apply()메소드는 데이터셋 전체에 변환을 적용하는 함수이다.
X=tf.range(10)
dataset=tf.data.Dataset.from_tensor_slices(X)
dataset=dataset.map(lambda x: x * 2)map()메소드가 각 원소마다 처리를 해 준다면,apply()메소드는 데이터셋 전체에 변환을 적용한다.
X=tf.range(10)
dataset=tf.data.Dataset.from_tensor_slices(X)
dataset=dataset.apply(tf.data.experimental.unbatch())- apply()메소드를 통해 unbatch()를 적용하였다. 결과적으로 10개의 원소로 이뤄져있던 기존 데이터셋이 1개의 배치로 변환되었다.
filter() take()
filter()메소드를 사용하면 원하는 조건식에 따라 데이터셋을 필터링할 수 있다.
X=tf.range(10)
dataset=tf.data.Dataset.from_tensor_slices(X)
dataset=dataset.filter(lambda x: x<10)take()메소드를 사용하면, 데이터셋에 있는 몇 개의 아이템만 볼 수 있다.
for item in dataset.take(3):
  print(item)

# tf.Tensor(0, shape=(), dtype=int32)
# tf.Tensor(1, shape=(), dtype=int32)
# tf.Tensor(2, shape=(), dtype=int32)
13.1.2 데이터 셔플링
shuffle()
shuffle()메소드는 training set에 있는 sample 추출에 있어서 독립적이고 동일한 분포를 갖도록 잘 섞어주는 메소드이다.shuffle()메소드의 데이터 샘플링 과정은 다음과 같다.- 1) 원본 데이터셋에서 원소의 개수를 0번째 원소부터 buffer_size만큼 추출하여 buffer에 채운다.
2) 새로운 item이 요청되면 이 buffer에서 random하게 한 개를 추출하여 반환한다.
3) 원본 데이터에서 0+buffer_size 번째 원소를 추출해 빈 buffer를 채운다.
4) 이 과정이 원본의 모든 원소가 사용될 때 까지 반복되고, buffer가 비워질 때 까지 계속된다. shuffle()메소드의 buffer_size 파라미터는 메모리 크기를 넘기지 않게 설정해야 하고, buffer_size가 데이터셋 크기보다 클 필요는 없다.
dataset=tf.data.Dataset.range(10).repeat(3)
dataset=dataset.shuffle(buffer_size=5, seed=42).batch(7)
for item in dataset:
  print(item)

# tf.Tensor([0 2 3 6 7 9 4], shape=(7,), dtype=int64)
# tf.Tensor([5 0 1 1 8 6 5], shape=(7,), dtype=int64)
# tf.Tensor([4 8 7 1 2 3 0], shape=(7,), dtype=int64)
# tf.Tensor([5 4 2 7 8 9 9], shape=(7,), dtype=int64)
# tf.Tensor([3 6], shape=(2,), dtype=int64)- 위 코드의 예시를 들어 설명하면, 먼저 dataset은 0~9가 3번 반복된 형태로 생성된다.
- buffer의 size가 5이기 때문에 buffer_size만큼 5개의 데이터 0,1,2,3,4가 buffer에 채워진다.
- batch(7)에 따라 7개의 원소가 하나씩 buffer에서 꺼내진다. 이 때 random으로 0이 뽑아졌고, 곧바로 빈 buffer에 원본 데이터의 다음 원소인 5가 채워진다. 즉, 1개가 뽑아지면 곧바로 원본 데이터에서 다음 순서인 원소를 채워넣는다.
- 즉, buffer의 원소들중에서는 random추출을 하되, buffer를 채우는 순서는 random이 아닌, 원본 데이터의 원소 index순서대로 채워넣게 된다.
- 이 과정을 원본 데이터의 원소들이 모두 사용되고, 버퍼가 모두 비워질 때 까지 반복한다.
데이터셋 용량이 메모리 용량보다 클 때
- buffer_size는 메모리 용량보다 클 수 없다. 때문에 데이터셋 용량이 메모리 용량보다 클 떄는 buffer_size는 데이터셋의 크기보다 필연적으로 작을수 밖에 없다. 결국 shuffle의 효과가 미미해지는 문제점이 있다.
- 이를 해결하기 위해 원본 데이터 자체를 shuffle할 수 있다. 그리고 epoch마다 또 shuffle해준다면 편향을 방지할 수 있다.
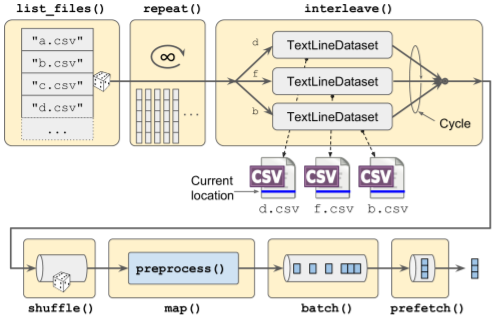
여러 파일에서 한 줄씩 번갈아서 읽기
- 샘플을 섞는 방법으로
shuffle()이 이용될 수도 있지만, 원본 데이터를 여러개의 파일로 나누고 훈련시 무작위로 읽는 방법이 많이 사용된다.
from sklearn.datasets import fetch_california_housing
from sklearn.model_selection import train_test_split
from sklearn.preprocessing import StandardScaler
import os

housing = fetch_california_housing()
X_train_full, X_test, y_train_full, y_test=train_test_split(housing.data,
                                                            housing.target.reshape(-1,1),
                                                            random_state=42)
X_train, X_valid, y_train, y_valid=train_test_split(
    X_train_full, y_train_full, random_state=42)

scaler=StandardScaler()
scaler.fit(X_train)
X_mean=scaler.mean_
X_std=scaler.scale_- 먼저 사용할 데이터로 california fetch data를 선택했다.
- train, validation, test 로 dataset을 split해주고, stadard scaler를 적용해 scaling까지 완료하였다.
def save_to_multiple_csv_files(data, name_prefix, header=None, n_parts=10):
  housing_dir = os.path.join('datasets', 'housing')
  os.makedirs(housing_dir, exist_ok=True) #housing_dir명으로 dir생성
  path_format=os.path.join(housing_dir, 'my_{}_{:02d}.csv') #저장

  filepaths=[] #file path 리스트
  m=len(data)
  #np.array_split()으로 n_parts만큼 레코드 길이를 나눔
  for file_idx, row_indices in enumerate(np.array_split(np.arange(m), n_parts)):
    part_csv=path_format.format(name_prefix, file_idx) #part 별로 file path 생성
    filepaths.append(part_csv)
    with open(part_csv, 'wt', encoding='utf-8') as f: #file path를 write mode로 open
      if header is not None:
        f.write(header) #column name 입력
        f.write('\n')
      for row_idx in row_indices:
        f.write(','.join([repr(col) for col in data[row_idx]])) #row마다 col별 데이터를 join함.
        f.write('\n')
return filepaths- 파일 경로마다 나눠진 데이터를 write하는 함수를 만들었다.
train_data=np.c_[X_train,y_train]
valid_data=np.c_[X_valid,y_valid]
test_data=np.c_[X_test,y_test]
header_cols=housing.feature_names+['MedianHouseValue']
header=",".join(header_cols)

train_filepaths=save_to_multiple_csv_files(train_data, 'train', header, n_parts=20)
valid_filepaths=save_to_multiple_csv_files(valid_data, 'valid', header, n_parts=20)
test_filepaths=save_to_multiple_csv_files(test_data, 'test', header, n_parts=20)- 함수를 통해 각 dataset를 20개로 나누었다.
with open(train_filepaths[0]) as f:
    for i in range(5):
        print(f.readline(), end="")

# MedInc,HouseAge,AveRooms,AveBedrms,Population,AveOccup,Latitude,Longitude,MedianHouseValue
# 3.5214,15.0,3.0499445061043287,1.106548279689234,1447.0,1.6059933407325193,37.63,-122.43,1.442
# 5.3275,5.0,6.490059642147117,0.9910536779324056,3464.0,3.4433399602385686,33.69,-117.39,1.687
# 3.1,29.0,7.5423728813559325,1.5915254237288134,1328.0,2.2508474576271187,38.44,-122.98,1.621
# 7.1736,12.0,6.289002557544757,0.9974424552429667,1054.0,2.6956521739130435,33.55,-117.7,2.621- 이제 본격적으로 분리된 파일을 섞어서 훈련에 사용해본다.
filepath_dataset = tf.data.Dataset.list_files(train_filepaths, seed=42)
for filepath in filepath_dataset:
    print(filepath)

tf.Tensor(b'datasets/housing/my_train_15.csv', shape=(), dtype=string)
# tf.Tensor(b'datasets/housing/my_train_08.csv', shape=(), dtype=string)
# tf.Tensor(b'datasets/housing/my_train_03.csv', shape=(), dtype=string)
# tf.Tensor(b'datasets/housing/my_train_01.csv', shape=(), dtype=string)
# tf.Tensor(b'datasets/housing/my_train_10.csv', shape=(), dtype=string)
# tf.Tensor(b'datasets/housing/my_train_05.csv', shape=(), dtype=string)
# tf.Tensor(b'datasets/housing/my_train_19.csv', shape=(), dtype=string)
# tf.Tensor(b'datasets/housing/my_train_16.csv', shape=(), dtype=string)
# tf.Tensor(b'datasets/housing/my_train_02.csv', shape=(), dtype=string)
# tf.Tensor(b'datasets/housing/my_train_09.csv', shape=(), dtype=string)
# tf.Tensor(b'datasets/housing/my_train_00.csv', shape=(), dtype=string)
# tf.Tensor(b'datasets/housing/my_train_07.csv', shape=(), dtype=string)
# tf.Tensor(b'datasets/housing/my_train_12.csv', shape=(), dtype=string)
# tf.Tensor(b'datasets/housing/my_train_04.csv', shape=(), dtype=string)
# tf.Tensor(b'datasets/housing/my_train_17.csv', shape=(), dtype=string)
# tf.Tensor(b'datasets/housing/my_train_11.csv', shape=(), dtype=string)
# tf.Tensor(b'datasets/housing/my_train_14.csv', shape=(), dtype=string)
# tf.Tensor(b'datasets/housing/my_train_18.csv', shape=(), dtype=string)
# tf.Tensor(b'datasets/housing/my_train_06.csv', shape=(), dtype=string)
# tf.Tensor(b'datasets/housing/my_train_13.csv', shape=(), dtype=string)list_files()메소드를 사용하면 file list를 각 원소별로 독립된 데이터가 되도록 변환해줄 뿐만 아니라 default value로 shuffle=True이기 때문에 file list가 잘 섞일 수 있다.
n_readers = 5
dataset = filepath_dataset.interleave(
    lambda filepath: tf.data.TextLineDataset(filepath).skip(1),
    cycle_length=n_readers)

for line in dataset.take(5):
  print(line.numpy())

# b'1.2012,12.0,1.4657534246575343,0.8986301369863013,1194.0,3.271232876712329,34.05,-118.27,2.75'
# b'4.2312,22.0,4.488027366020525,0.9806157354618016,3508.0,4.0,37.36,-121.83,1.838'
# b'3.4917,35.0,5.065068493150685,0.9315068493150684,963.0,3.297945205479452,33.91,-118.25,1.095'
# b'5.0261,33.0,5.640756302521009,0.9789915966386554,1359.0,2.8550420168067228,33.8,-118.04,2.451'
# b'2.8285,17.0,4.996610169491525,1.0677966101694916,2307.0,2.606779661016949,35.49,-120.66,1.713'interleave()메소드를 통해 한 번에 cycle_length만큼의 데이터셋에서 1줄씩 데이터를 읽어올 수 있다.- skip(1)은 첫 번째 행이 column names이기 떄문에 설정하도록 한다.
- 데이터는 ASCII로 encoding된 byte string으로 되어있기 때문에 다시 문자열로 디코딩하는 작업이 필요하다.
13.1.3 데이터 전처리
- 13.1.2에서 파일별로 데이터를 나눌 때 byte string으로 저장된 것을 확인하였다.
- 때문에 이를 다시 파싱하여 tensor로 바꿔줄 필요가 있다.
n_inputs=8

def preprocess(line):
  defs=[0.] * n_inputs + [tf.constant([], dtype=tf.float32)] #record의 default 형태 정의
  fields=tf.io.decode_csv(line, record_defaults=defs) #decode
  x=tf.stack(fields[:-1]) #target 제외 stack으로 쌓음
  y=tf.stack(fields[-1:]) #target 쌓음
return (x-X_mean) / X_std, y # X 데이터를 scaling후 return 함- 파싱한 line을 defs형식에 맞춰 decode해주고 data와 target을 분리하여 return해주는 함수를 생성하였다.
13.1.4 데이터 적재와 전처리를 합치기

def preprocess(line):
  defs=[0.] * n_inputs + [tf.constant([], dtype=tf.float32)] #record의 default 형태 정의
  fields=tf.io.decode_csv(line, record_defaults=defs) #decode
  x=tf.stack(fields[:-1]) #target 제외 stack으로 쌓음
  y=tf.stack(fields[-1:]) #target 쌓음
  return (x-X_mean) / X_std, y # X 데이터를 scaling후 return 함

def csv_reader_dataset(filepaths, repeat=1, n_readers=5,
                       n_read_threads=None, shuffle_buffer_size=10000,
                       n_parse_threads=5, batch_size=32):
  dataset=tf.data.Dataset.list_files(filepaths).repeat(repeat)#repeat해주면서 file순서 섞음
  dataset=dataset.interleave(
      lambda filepath: tf.data.TextLineDataset(filepath).skip(1),
      cycle_length=n_readers, num_parallel_calls=n_read_threads)
  dataset=dataset.shuffle(shuffle_buffer_size)
  dataset=dataset.map(preprocess, num_parallel_calls=n_parse_threads)
  return dataset.prefetch(1)
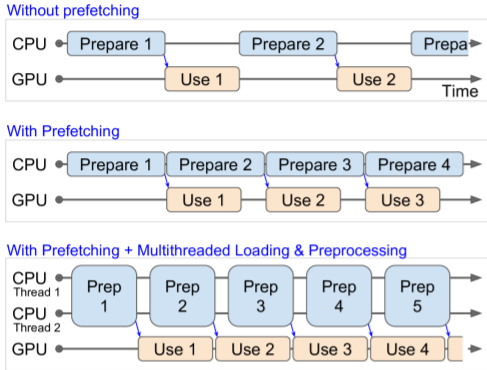
13.1.5 프리패치(prefetch(1))

prefetch(1)사용하면 CPU가 GPU에게 작업할 배치를 넘겨준 직후 바로 다음 배치에 대한 준비를 시작하게 된다. 이를 통해 전체 작업속도가 단축될 수 있다.- 또한 num_parallel_calls를 통해 여러개의 스레드를 생성해 데이터를 적재하고 전처리하여 GPU의 작업 시간보다 빠른 시간 안에 데이터에 대한 준비를 끝낸다면 GPU의 작업이 끝나는 즉시 다음 배치를 넘겨줄 수 있기 때문에 GPU를 100%활용할 수 있다.
- 데이터셋이 메모리에 모두 적재될 수 있을 만큼 작다면 RAM에 모두 캐싱할 수 있는
cache()메소드를 사용할 수도 있다.
'Deep Learning > Hands On Machine Learning' 카테고리의 다른 글
| 13.3 입력 특성 전처리 (0) | 2021.11.12 |
|---|---|
| 13.2 TFRecord 포맷 (0) | 2021.11.12 |
| 12.4 텐서플로 함수와 그래프 (0) | 2021.11.11 |
| 12.3 사용자 정의 모델과 훈련 알고리즘 (0) | 2021.11.11 |
| 12.2 넘파이처럼 텐서플로 사용하기 (0) | 2021.09.29 |


